• Skip to main content
  • Skip to primary sidebar

Coffee with Kel

Building relationships, encouraging hope

Recipes

Chili = Cold Weather Comfort Food

January 5, 2017 By kelly 6 Comments

We had a really mild autumn and that may be putting it entirely too moderately considering we went to the apple orchard and pumpkin farm in shorts in October. Truth be told, we haven’t had any real lingering cold snaps this winter, which I do NOT complain about not having, but it looks like we’ve got a big one coming this weekend. Weather forecasters have even mentioned the “s” word — you know “SNOW!” I know that people joke about southerners running to the store to buy bread and milk when snow is in our forecast and that’s not entirely inaccurate based on store shelves I have seen when the forecast had the infamous snowflake icon on it. I will freely admit that, true to my southern nature, I do feel the need to make sure we’re stocked up well on groceries if such weather is coming our way. Having been snowed in* twice in a few years, once for almost a week, I don’t think it’s anything but wise to be prepared. (*Often, snow and ice go hand in hand in our area making the roads a nightmare for travel and there are only so many snow plows in the metro. Thus, it’s true – we get snowed in.) When it’s going to be cold, I start thinking of good ole comfort foods and one thing that always comes to mind is chili. I’ve never been one to cook chili when it’s warm and never when it’s hot, but give me a cool snap or some cold weather and I’m pretty likely to have a pot of chili simmering.

If you need a chili recipe, I’m sharing the one I use. This one is even whole 30 friendly if you leave out the beans.

Kel’s Turkey Chili

  • 1 onion, diced
  • 1-2 garlic cloves, minced
  • 1 (280z) can or large box, crushed tomatoes (no sugar added)
  • 1 can Rotel, drained
  • 2T chili powder ( you can use more or less to taste)
  • 1 teaspoon cumin
  • 1/4-1/2 teaspoon paprika (I use “sweet”, just personal preference)
  • 1 teaspoon salt
  • 1/2 teaspoon black pepper (or to taste)
  • 1 can drained and rinsed beans (I use kidney and/or pinto. You can also use black beans, chili beans, etc. Beans negate Whole 30 for this recipe.)

Saute onion and garlic in extra virgin olive oil; add ground turkey and brown together. Once the meat is cooked, add in the 28-oz can crushed tomatoes and the drained can of Rotel. To that, add seasonings and the drained beans. Stir to blend well. Simmer and serve. If you’re on Whole 30, this chili is great topped with avocado. You can also serve it over a baked potato and be Whole 30 compliant. Otherwise, I like mine with grated sharp cheddar and some sour cream.
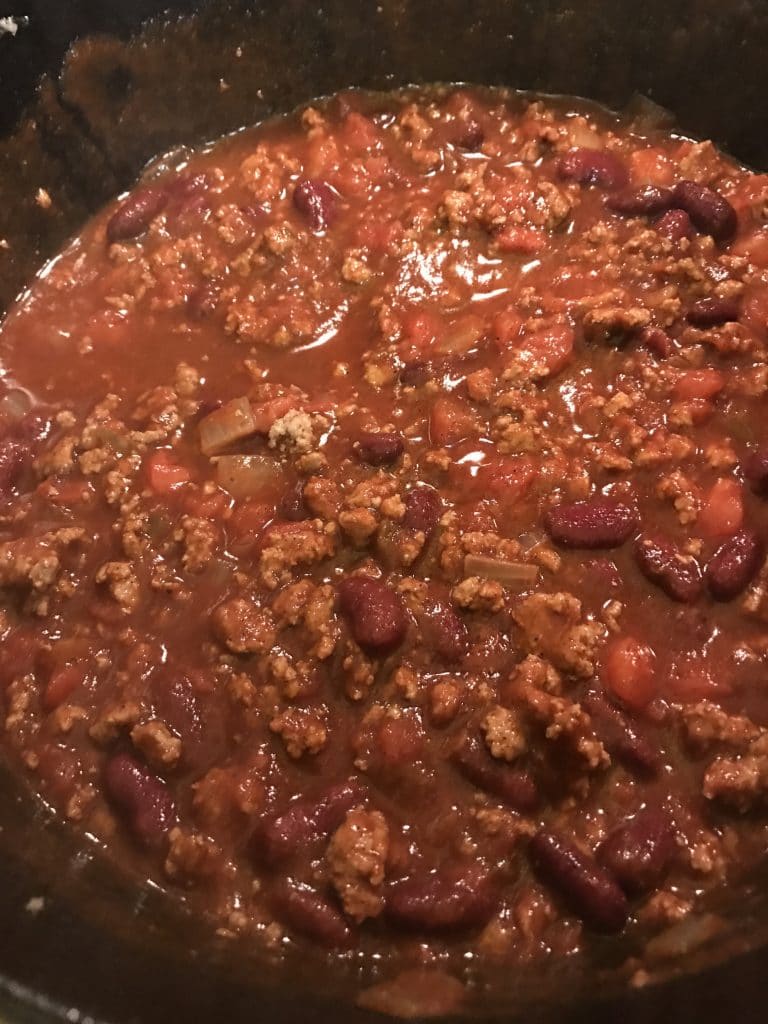

(This isn’t the best photo, I know, but it’s a recent photo of a batch of chili I made in the awesome cast iron Dutch oven my ILs gave me for Christmas.)

Being a good ole Southern girl, I have plenty of comfort foods and they all involve carbs. Chicken and dumplings is a comfort food I plan to share on the blog one day, but the way I make it is a method rather than a recipe, so I’ll have to consider a video post. Made from scratch buttermilk biscuits are also a comfort food and, again, no recipe – just a passed down method. I adore chicken & rice, cornbread dressing, buttery rice or rice with gravy, fried cornbread, and macaroni and cheese – just to name a few more carb laden comfort foods. I could eat those things daily, but…I don’t. That’s not to say I don’t wish I could though. (wink) So, what’s your chili recipe? And what are your favorite comfort foods? Please comment and share. It’s fun to recipe swap.

Happy eating and here’s to staying warm and well fed,
Kel


Filed Under: Recipes 6 Comments

Buffalo Chicken Dip

December 31, 2016 By kelly 2 Comments

My go-to recipe when I need to make an appetizer or snack is bound to be Buffalo Chicken Dip. I’m telling y’all, this stuff is always a hit whenever we serve it or take it places. If I’m being honest, it doesn’t look like much in the baking dish because it’s nothing fancy, but it really tends to be a crowd pleaser when people try it. If you like buffalo wings OR even just have a tasty for spicy foods, give this recipe a try.

Buffalo Chicken Dip

  • 2 cans chicken (I buy canned chicken breast meat), shredded with a fork
  • 1 (8oz) block cream cheese (low fat is okay, but just trust me and steer clear of fat free)
  • 1 cup ranch dressing (again, low fat is fine but fat free is nasty)
  • 1/2 cup hot sauce (I normally use Frank’s Red Hot)

Combine all ingredients together and mix well. Pour into a greased 8×8 baking dish or a small casserole dish. Bake at 350 for 30 minutes. Serve with “scoops” corn chips or tortilla chips.

Variations: You can throw all of this in a crock pot and heat as desired.  You can substitute bleu cheese dressing for ranch. You can also top with cheese. Also, if you don’t like the idea of canned chicken (I assure, it works in this recipe, but…) you can always use shredded cooked chicken of your choice.

I first tried this dip when my friend Terri served it at, as I recall, her oldest daughter’s first or second birthday several years ago (she’s 13 now). Confessing right now that I wasn’t sure I would like it, but I couldn’t get enough of it. It’s still a go-to or me and I wanted to share in case anyone ever needs an easy appetizer that goes over well.

Pass the chips…
Kel


Filed Under: Recipes 2 Comments

Turkey Salisbury Steak

June 12, 2013 By kelly 2 Comments

Last evening, I made a new (to us) recipe that my friend Nancy shared with me for turkey salisbury steak.  We are trying to eat out less and, naturally, eat at home more, so I’m always looking out for new recipes that are family friendly. This one hit the mark! It reminds me of the turkey meatballs and gravy my sweet Gran makes that I love so much. It’s really easy to make and we all enjoyed it. It’s also versatile enough that you COULD do meatballs with it and you can also add mushrooms, which Nancy does with her’s.

Again, disclaimers – these are cell phone pics and products I just so happen to have here at home.

*****

Place 20-oz ground turkey in a mixing bowl

IMG_6541

Add Worcestershire sauce to ground turkey:

IMG_6543

I used 2-tablespoons of Worcestershire – you can use more or less to taste:

IMG_6544

Chop an onion and add HALF the chopped onion to the ground turkey:

IMG_6542

Add a handful of panko or other breadcrumbs to the turkey:

IMG_6550

(NOTE: I totally forgot the breadcrumbs and mine still turned out good.)

Lastly, add one large egg to the turkey and blend all the ingredients together:

IMG_6545

Once mixed, form into patties and place into a hot greased skillet:

IMG_6549

Cook in a large skillet on medium-high heat until both sides are seared but the patties are not yet cooked through. Remove patties to a plate and keep warm.

IMG_6551

Now, it’s time to make the GOOD part — the gravy.

You’ll need the other half of the chopped onion,  2 tablespoons of butter, 1-2 tablespoons of flour and 1-1.5 cups chicken broth. Nancy’s recipe also calls for 2-3 minced mushrooms, so add those if you like. My family wouldn’t eat it if they saw mushrooms, so I left them off this time.

IMG_6548

Place the butter and onions (mushrooms too, if you use them) in the skillet and cook until the veggies are tender.

IMG_6552

Next, carefully sprinkle the flour over the cooked onions/mushrooms:

IMG_6553

Mix the veggies and flour together, cooking for about 2 minutes:

IMG_6554

Now, add the chicken broth and whisk together until it starts to thicken. You can measure, but I “eye-balled” it and just added until it seemed about right:

IMG_6555

When your gravy is thickened, hit it with some black pepper. This is my own personal addition because, if you ask me,  black pepper makes everything better. Whisk that in to blend:

IMG_6557

Once the gravy is ready, then add the “steaks” back to the skillet with the gravy:

IMG_6558

(Note: mine were cracked because I forgot the breadcrumbs. Didn’t affect the taste at all. And, it helped this nervous nelly make sure they weren’t pink inside when I was cooking them.)

Cover and cook 8-10 minutes, turning once or twice.

I served our’s with mashed potatoes. Actually, I served my own portion on top of mashed potatoes – YUM!

IMG_6560

You could also serve with rice which would also be fantastic.

Our side vegetable was green beans which I cooked with WildTree’s Garlic & Herb blend. I have to say, it was an easy meal to prepare and we all liked it. I think I’ll try this method and make meatballs one of these days to see if I can make them like my Gran does.

Oh and if you are “scared” of making gravy, like I was, don’t be. This is crazy easy. Trust me.  Thank you, Nancy, for sharing a great recipe!

********
Turkey Salisbury Steaks
Yield: 4 steaks

  • 1 20-oz package ground turkey
  • 1 onion, chopped
  • 2 tablespoons Worcestershire Sauce
  • Panko breadcrumbs
  • 1 large egg
  • 2 tablespoons butter
  • 2-3 mushrooms, optional
  • 1-2 tablespoons flour
  • 1-1.5 cups chicken broth
  • Black pepper
  1. Add ground turkey to a bowl.
  2. Add half the chopped onion, Worcestershire sauce, breadcrumbs and egg to the turkey and blend together well.
  3. Form four patties from the turkey mixture.
  4. Add patties to hot, greased skillet. Cook  on medium-high heat until both sides are seared but the patties are not yet cooked through.
  5. Remove patties to a plate and keep warm.
  6. Place the butter and onions (mushrooms too, if you use them) in the skillet and cook until the veggies are tender.
  7. Next, carefully sprinkle the flour over the cooked onions/mushrooms.
  8. Mix the veggies and flour together, cooking for about 2 minutes.
  9. Now, add the chicken broth and whisk together until it starts to thicken.
  10. When your gravy is thickened, hit it with some black pepper. Whisk that in to blend.
  11. Once the gravy is ready, then add the “steaks” back to the skillet with the gravy.
  12. Cover and cook 8-10 minutes, turning once or twice.
  13. Serve with mashed potatoes or rice and a side vegetable.


Filed Under: Recipes 2 Comments

Amazing Banana Chocolate Chip Muffins

June 11, 2013 By kelly Leave a Comment

I recently bought a case of organic blueberries at Whole Foods (on sale…score!) and made the amazing blueberry muffins I posted about last year. I must say, those things are seriously fab!!

This week, we have some bananas that had gotten really ripe sitting on the counter, so I decided to use the basics of that blueberry muffin recipe to create a banana chocolate chip muffin recipe. Spoiler alert…they turned out GREAT!!

I’m happy to share the recipe and I even have photos this time. I should throw in a couple of disclaimers here. One, I took these photos with my iPhone so they may not be the best ever. Two, some product brands are shown, but that’s just what I had here at home.

So, here is how to make these amazing muffins. Enjoy!

*****

First, melt 5-tablespoons of butter and 1 cup of brown sugar together over medium heat – about 3 minutes

IMG_6513  IMG_6514  IMG_6515

While melting the butter and brown sugar, stir often so that it doesn’t scorch. Once it’s melted together, remove from heat and let cool for about 5 minutes. While it is cooling, move on to the next steps…

In a mixer, add  two eggs together with 1/4 cup of mayo with olive oil:

IMG_6516

Beat the eggs and mayo together until thoroughly combined.

IMG_6518

In a separate bowl, blend together 1 cup of all-purpose flour, 1 teaspoon baking powder, 1/2 teaspoon baking soda and a pinch of salt.

I like to take a whisk and blend my dry ingredients together when I am baking:

IMG_6520

Next, slowly blend the dry mixture in with the egg and mayo mixture. Once that is fully incorporated, then blend in the brown sugar and butter mixture.

Next, add three ripe bananas to the mixture:

IMG_6523

Blend the ripe bananas in well. Then, add 1 cup old-fashioned oats:

IMG_6526

Once the oats are nicely incorporated into the mixture, then stir in 1/2 cup mini chocolate chips and mix them in well.

IMG_6528

Line muffin cups with cupcake liners. This is crucial to the success of these muffins, so please don’t skip this step.

IMG_6529

Fill each muffin cup about 3/4 full. I have a big “cookie scoop” that I use and I put two of those (not too full) in each cup:

IMG_6531

Sprinkle a bit of white sugar over the top of each muffin:

IMG_6530

Put the muffins in a pre-heated 375-degree oven:

IMG_6533  IMG_6534

Bake muffins for about 20-25 minutes, or until golden brown on top and done in the center. Mine baked in about 22 minutes today.

IMG_6535

The results? Mmmmmmmmmmmmmmmmmm! So good!

photo (19)

These muffins are AMAZING! So tasty!! And, I don’t have to feel guilty because they aren’t unhealthy either. This recipe is a winner and I’ll be hanging onto it for future use.

Oh and this mixture would have made about 16 muffins for me. I only needed 12, but I could have made some extras.

********

Here are the recipe and instructions without photos:

Amazing Banana-Chocolate Chip Muffins

  • 1 cup all purpose flour
  • 1 teaspoon baking powder
  • 1/2 teaspoon baking soda
  • 1 pinch of salt
  • 2 large eggs
  • 1/4 cup mayo with olive oil
  • 5 tablespoons butter
  • 1 cup packed light brown sugar
  • 3 ripe bananas
  • 1 cup old fashioned oats
  • Granulated sugar
  1. Heat oven to 375.
  2. Line two 12-cup muffin tins with muffin-cup liners. This recipe won’t work without them.
  3. In a medium saucepan over medium heat, melt together butter and brown sugar, about 3 minutes, stirring frequently. Cool slightly, about 5 minutes.
  4. In a large bowl, beat eggs with mayo until thoroughly combined.
  5. Gradually add melted butter and brown sugar into egg mixture and beat well.
  6. In a small bowl, combine flour, baking powder, baking soda, and salt. Gradually add this to egg mixture.
  7. Add 3 ripe bananas and blend well.  ‘
  8. Next add oats and blend well.
  9. Then stir in 1/2 cup mini chocolate chips.
  10. Spoon mixture into lined muffin cups, about 3/4 full.
  11. Bake for 20-25 minutes, or until edges are medium brown and tops are firm.
  12. Cool for 5 minutes, then remove muffins (in their papers) and finish cooling on rack.

Filed Under: Recipes Leave a Comment

Maple Dijon Chicken = FABULOUS

April 30, 2013 By kelly 1 Comment

I really should get better about posting pictures to this blog. Wouldn’t that be a nice touch? Maybe I’ll get around to that soon because, really, a blog post with pictures has a certain appeal to it, I think. Especially with recipes. Isn’t it nice to not only read a recipe, but also see maybe some step-by-step photos and certainly what the end result should look like? I think it’s great, but I haven’t done that yet. My bad. I’ll try to do better.

Without photos, please take my word about the following recipe. I’ve seen in pinned under several different names on Pinterest ranging anywhere from “best chicken in the world”, to “man-pleasing chicken” to, simply, “maple dijon chicken.” So, I decided to stay with simplicity.

This chicken is incredibly delish. y’all! It doesn’t have to marinate which is a bonus for me because I almost never remember ahead of time that I need to get a marinade done in the morning for dinner at night. This chicken is flavorful and quite versatile. It’s become a regular in our household. I serve it with various side items such as rice, yellow and/or zucchini squash with onions, green beans, English peas or butter beans. The sides are endless. It pairs quite nicely with many veggies.

Maple Dijon Chicken
(Adapted from Six Sisters’ Stuff). 

  • 1.5 pounds of boneless skinless chicken breasts cut into several even strips
  • 1/2 cup honey dijon mustard
  • 1/4 cup real maple syrup (get the good stuff. not the breakfast pancake variety)
  • 1 tablespoon rice vinegar
  1. Preheat oven to 450-degrees
  2. Blend the mustard, syrup and vinegar together in a small bowl.
  3. Place chicken in a non-stick aluminum foil lined baking dish.
  4. Brush both sides of chicken generously with sauce.
  5. Bake at 450 for 40 minutes, turning and recoating with sauce halfway through cooking. (Chicken is done when internal thermometer reads 165-degrees.)
  6. Let sit 5 minutes, then serve.

The original recipe I used calls for chicken thighs, but we prefer chicken breasts. It also calls for fresh rosemary to be garnished on top after baking, but I never seem to remember it and, honestly, it’s good without it, so we skip it.

Mickey and the girls love it when I make this dish. Any time I can find a main dish that makes us all happy, it’s a keeper. I’m glad I ran across this one on Pinterest. It has become a favorite in our house and is an easy go-to main dish.

Kelly

Filed Under: Recipes 1 Comment

  • « Go to Previous Page
  • Page 1
  • Page 2
  • Page 3
  • Page 4
  • Interim pages omitted …
  • Page 7
  • Go to Next Page »

Primary Sidebar

About me

Subscribe to Blog via Email

Enter your email address to subscribe to this blog and receive notifications of new posts by email.

Recent Posts

  • What’s a 2 To Do? Part Five…
  • What’s a 2 To Do? Part Four…
  • What’s a 2 To Do? Part Three…
  • What’s a 2 To Do? Part Two…
  • What’s a 2 To Do?

Blogs

  • Kelly’s Korner
  • Mickey's Blog
  • Proverbs 31 Ministries
  • Think Inclusive

Copyright © 2026